Hi friends. So this morning I was playing around with some leftover quilting squares and I made up a dress pattern. It's ideal for a one-two year old child, but can be used by a three year old, maybe even four as a summer shirt, due to the adjustable nature of the straps.
Above is the dress I made up almost by accident. Below is the step by step.
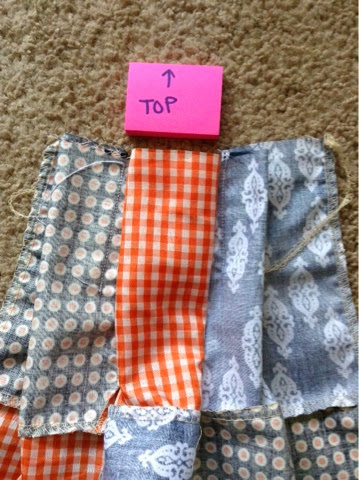
Make two 3x4 quilts out of six inch squares. If you're making this dress for a child over the age of two and you want it to be a dress, not a top, use larger squares.
From now on, do the same action to both pieces until I tell you otherwise. Ok, so fold the quilt over, pretty side in, and pin the square in the center like so. Stitch it from the top down to halfway through the top square. We're making a box pleat.
Open it back up, face side down. Either stitch it in place, or pin it, if you don't, the fabric could move out of a box pleat.
Fold one side under until the edge of the fabric is aligned with the edge of the far edge of the box pleat.
Do that to both sides. We're making pleats that open facing the box pleat. Pleats are cool. Clearly I went to private school. Who else would love pleats this much?
This is what it'll look like. Being careful not to sew the edges into the center, sew a stitch halfway down the square on each side following the line of the pin. Ugh, that sentence. Ok, sew where the two side pins are. Go halfway down the top square of the quilt. Does that make any sense?
After sewing, when you open it up and face it down again, this is what it should look like. The folds from the two side pleats should be facing out towards the edge, by the way. Do a top stitch over the top to hold all the pleats in place.
Hem the first one and a half squares along the side. This is where the arm holes will be. It's basically to make it look all clean and to prevent fraying.
This is about what each piece should look like so far.
Find a soft, stretchy, thin piece of fabric. Cutting across the bottom of a tshirt (creating a ring, and then cutting it once to make a long, thin strand) or using a scrap is an easy way to go. I think it's the best material to use because it ties easy and it's soft on skin. A nice ribbon or an extra long shoelace would work, too. Pretty much whatever you want.
Lay it across the top insides of the two pieces. You'll notice one of my sides is a little wider than the other on top. That's perfectly ok. The smaller side will just be the back. This is a pretty flexible pattern.
Flip the top over your string and pin, being extra careful not to pin the string. You want the string to be able to move freely in the tunnel you're creating for it. You can sew the tunnel thing now and loop the string in later, but I find that unbearably putsy, so I just sew carefully with the string already in.
Now just turn it inside out, sew up the sides and hem the bottom. That's it.
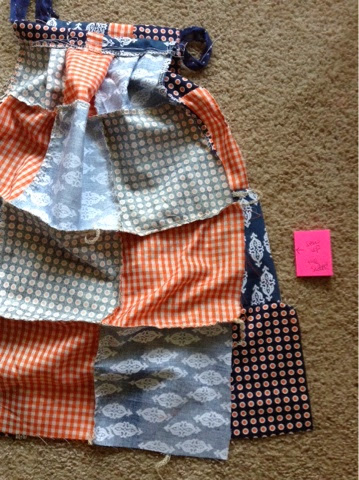
End result. This one isn't ironed, but you get the idea. Still pretty adorable. Ok, that's all I have for today. Bye.


These are adorable. I'm so impressed!
ReplyDelete