

Tuesday, July 29, 2014
Beware of Dog?
Hi friends. I have a lot of projects that are in the works right now, but I finished a super simple project today that I can share. I bought a simple outdoor straw (or something) rug from Ikea and added my own text with stencils and fabric paint. Here's a picture of the finished product. Enjoy!
Monday, June 30, 2014
The Dog Who Steals Pillows
So this morning I woke up with a bit of a migraine. I've cricked my neck a couple if times during the move so now my head is angry. Anyway, I got up at six to make breakfast for James and then I decided to take a quick nap on the couch before I ran my errands, so I grabbed a spare pillow. Here's why I can never actually get in a nap on the couch: (photos taken with snapchat)


 She's snoring in the above picture. Intermittently kicking the side/top of my head and snoring.
 I finally gave up and decided to blog.
 Aaannnnd then there's Sansa. Not only is she stealing the pillow, she brought a snack. Awesome.
 As I wrote that last part, Lady shoved the bone Sansa was chewing off the couch and has regained solo control of the pillow.
  Sorry Sansa. I know how you feel.
Wednesday, June 18, 2014
Wood Floor Revival

(Ok, so actually, I said "we" but what I meant was James, my parents, Andy, and Hugh. My ankles swelled up when I was up there for, like, two minutes, so I stayed downstairs and worked on other projects.)


Also, I built a garden on the east side of the house:

Alright, have a great rest of the week, I'll update more soon!
Wednesday, June 11, 2014
New House
Hi friends! This is going to be a quick update because I'm typing it on my phone and we have so much we're doing right now.  We own this house! Our offer was accepted in early April, but the sellers wanted a June closing date and that was done with us, so we just closed on Monday.
Here's the house's story:
Built in I believe 1958 and owned by the same couple until a few years ago. The lady we bought it from walked into a house that hadn't been remodeled since the 60s. She did a ton of work on the house and kept it in good condition.
However, she had two cats with what I can only guess is a bladder disorder. Cat pee was soaked (SOAKED) into every room with carpet. Luckily the main floor is a mix of hardwood and tile, and the basement carpet (which was by far the worst) was removed before we closed, but the upstairs bedrooms and hallway were carpeted. James and I are both allergic to cats, so on the day we removed the carpet both my ankles puffed up like marshmallows in the microwave and both James eyes turned red. Under the carpet is hardwoods, so now our job is to remove all the black cat pee stains, sand it, and refinish it.
We actually have several things going right now. I'm going around the house and priming some of the woodwork and the fireplace that's been painted jet black. Too dark for my taste. Anyway...
I'll blog about our different projects as they get finished, but I just wanted to update this blog quickly. Ok, bye!
Wednesday, May 14, 2014
D.I.Y. Adjustable Summer Dress
Hi friends. So this morning I was playing around with some leftover quilting squares and I made up a dress pattern. It's ideal for a one-two year old child, but can be used by a three year old, maybe even four as a summer shirt, due to the adjustable nature of the straps. Above is the dress I made up almost by accident. Below is the step by step.
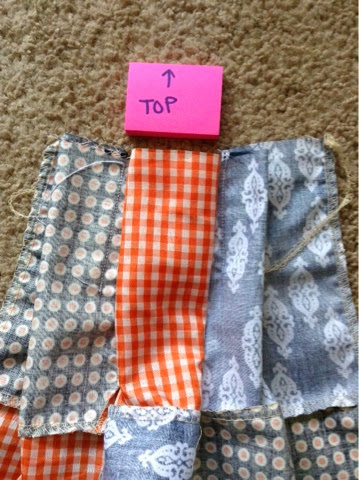
 Make two 3x4 quilts out of six inch squares. If you're making this dress for a child over the age of two and you want it to be a dress, not a top, use larger squares.
 From now on, do the same action to both pieces until I tell you otherwise. Ok, so fold the quilt over, pretty side in, and pin the square in the center like so. Stitch it from the top down to halfway through the top square. We're making a box pleat.
 Open it back up, face side down. Either stitch it in place, or pin it, if you don't, the fabric could move out of a box pleat.

 After sewing, when you open it up and face it down again, this is what it should look like. The folds from the two side pleats should be facing out towards the edge, by the way. Do a top stitch over the top to hold all the pleats in place.
  Hem the first one and a half squares along the side. This is where the arm holes will be. It's basically to make it look all clean and to prevent fraying.
 This is about what each piece should look like so far.
 Lay it across the top insides of the two pieces. You'll notice one of my sides is a little wider than the other on top. That's perfectly ok. The smaller side will just be the back. This is a pretty flexible pattern.
 Flip the top over your string and pin, being extra careful not to pin the string. You want the string to be able to move freely in the tunnel you're creating for it. You can sew the tunnel thing now and loop the string in later, but I find that unbearably putsy, so I just sew carefully with the string already in.
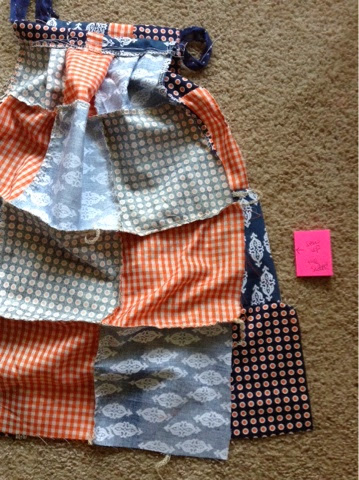 Now just turn it inside out, sew up the sides and hem the bottom. That's it.
  End result. This one isn't ironed, but you get the idea. Still pretty adorable. Ok, that's all I have for today. Bye.
Fold one side under until the edge of the fabric is aligned with the edge of the far edge of the box pleat.
Do that to both sides. We're making pleats that open facing the box pleat. Pleats are cool. Clearly I went to private school. Who else would love pleats this much?
This is what it'll look like. Being careful not to sew the edges into the center, sew a stitch halfway down the square on each side following the line of the pin. Ugh, that sentence. Ok, sew where the two side pins are. Go halfway down the top square of the quilt. Does that make any sense?
Find a soft, stretchy, thin piece of fabric. Cutting across the bottom of a tshirt (creating a ring, and then cutting it once to make a long, thin strand) or using a scrap is an easy way to go. I think it's the best material to use because it ties easy and it's soft on skin. A nice ribbon or an extra long shoelace would work, too. Pretty much whatever you want.
Tuesday, May 13, 2014
Super Easy & Cute Baby Clothes
Hi friends. My Aunt informed me last weekend that I haven't updated my blog since early March. Sorry about that! We were house hunting, then we were buying a house, and then I went to Medugorje. I'll try to do a blog on the house-buying process and another on the awesomeness that is Medugorje, but for right now, I just want to tell you about making baby clothes. Cool?


 This is the backside, and those are working pockets, although I can't think of a single reason for a one-year-old to need pockets.
 These are supposed to be like those quilted shorts that have been popular in the last 10 or so years. They don't look quite right in this pic, but hopefully they'll look good on.
  Kid of a casual sporty short. Basically the same design as the first shorts for him, except no back pockets.
 Another casual pair, thicker t-shirt material, I feel like the drawstring really makes them cute. I was going to add back pockets, but decided one simpler pair might be nice.
 My version of baby golf shorts. Woven fabric, workable back pockets, and honestly I'd buy these for James if they sold them in the men's section. Elastic waist makes them baby-friendly.
For those of you who are not cool with me moving on to baby clothes, stop reading this. That'll show me. For those of you who are cool with the transition, here we go.
Ok, so as some of you (but certainly not all of you) may know, I really enjoy sewing. As you may or may not also know, I watch two of my girlfriends' kids (2 friends, each with their own child, not twins, that seems to be a confusing point to some people) from time to time or sometimes all week. So, both babes recently turned 1, so I made summer play clothes. I didn't have any patterns, I just traced their own pants for the shorts/ pants patterns and for the girl tops, I honestly just looked at pics on Pinterest. They're nothing too special, but everything is cute when it's little, so I wanted to show the end results.
Here's the little girl's clothes:
Kind of a nautical theme in this outfit. All knitted fabric for stretch.
The tank top looks tiny, but that's just the angle, and the fact that all the shorts had extra room built in for cloth diapers.
These don't have a top, but I feel like the blue and white top would go really nicely with them.
This looks weird laid out flat, but it should look adorable on, and it goes well with the pink shorts.
I also made this dress, but I held it up to her, and I could already tell it was too small. Huge bummer.
Here's the little boy's clothes. They specifically needed shorts:
Ok, so that's it, that's my newest thing. Well, I guess it was my newest thing. Now my new thing is packing for the move.
I'll update again soon! Bye!
Friday, March 7, 2014
Real Food Tostadas

Here's the stuff you'll need:
2-3 tomatoes
1/2 onion
2 Jalepenos
2-3 avocados
Cilantro (lots)
Lime juice
Salt
Cumin
Cayenne pepper
2 cans black beans
Garlic
Corn tortillas
Greek plain yogurt/ vegan soy yogurt
James had fish (seasoned like you would for fish tacos) and cheese on his as well, but he said he thought they weren't necessary. Basically, he thinks it's better without.

Dice tomatoes and the half onion. Cut the seeds out of the Jalepenos and cut into small pieces...or leave them in if you like really spicy foods. We're not so ambitious. Add a sprinkle of salt and a little lime juice. That's it.
Ok, the top right is just avocados pitted, peeled, and sliced.
Bottom left is black beans. Strain one can in a colander, and blend the other can in a blender, turning it into a kind of pastey substance. Mix the two together with garlic, cayenne, and cumin (no idea how much I used...so just wing it)
The bottom left is the last piece of the puzzle and it really pulls the whole experience together. Put a lot of cilantro leaves in the blender. No idea how to say how much, I basically buy one bunch at the grocery store, take ALL the leaves and stick them all in the blender. Add some garlic (minced if you can) and then add the yogurt. I think I used about a cup, plus I added a little water because my blender is old and needed a little help. Blend until no leaves are left. I actually like the texture with a little water because it's easier to pour and it mixes better with the other textures.


Once they're nice and cooked, take them out and add the avocados, and then the cilantro-yogurt dressing. Now put them on a plate and eat them. Om nom nom.
Friday, January 31, 2014
Vegan Tomato Veggie Quinoa Soup
Hi friends. So James came home sick from work yesterday and stayed home sick today. He's got a nasty cold, so I thought I'd try my hand at making a yummy soup that soothes and nourishes. What I came up with was pretty tasty. Here's what I did.

Chop an onion, a couple stalks of celery and a handful or two of baby carrots into smaller than a dime size pieces. Put in the bottom of your soup pot with a little olive or coconut oil. Cook on medium-high until softened. Add basil and oregano.
Add two can of diced tomatoes that you've already blended in the blender, plus a can that you've left un-blended. That's three cans total. Turn the temp down to medium-low.
Now, in a seperate pot, take 2/3 cups dried quinoa with 1 1/3 cups water. Follow directions on quinoa package for cooking. Once properly cooked, add it to the soup mix.
After about 45 minutes of simmering, add frozen corn kernels (use your judgement on what looks about right. Then chop up some kale and stir that in, too. Serve once the kale has softened.
Don't forget to salt and pepper to taste. Enjoy!
Thursday, January 16, 2014
Smoothie Is A Funny Word
Hi friends. Well, I've been vegan for around 2 1/2 weeks, and I've found that smoothies truly make everything easier. I have one pretty much everyday. 

 Other exciting news: I recently joined Pottermore and found out I'm a Hufflepuff. At first I was kind of bummed, but after reading what J.K. Rowling feels about Hufflepuff, I'm pretty excited. Go team.
I make fairly simple smoothies. Here's what I do. Buy both fresh and frozen fruits, a juice that's actual fruit juices and not sugar/concentrate. V8 fusion isn't perfect, but I really like it, so I use it. Don't use V8 splash, that's just sugar. Ok, anyway, I also add spinach because it's amazing for you. Bananas are a good fruit to get fresh, and I usually use frozen strawberries, because it's usually cheaper to buy berries frozen. The blackberries are fresh because I got them on sale at Costco.
Here's another I did. Fresh and frozen mangos with a banana, strawberries, and spinach. So basically just pick fruits you like and go to town. Some people use almond milk instead of juice, but it don't like the almond milk flavor, I feel like it takes away from the fruit flavor, but if that's your game, by all means, go right ahead. Also, if you eat animal bi-products, might I suggest chobani yogurt in your smoothie? Good source of protein and a good fruit flavor.
Ok, that's about it for me. Have a great day!
Sunday, January 5, 2014
3 Vegan-Friendly Meat-Alternatives
Hi friends. So, I've been vegan for almost a week, and I've tried out some meat alternatives that I'd like to share with you, along with my reviews and recipes. Enjoy!
Tofu: made with home-made red sauce and served over noodles


 It's negative temps here in sunny Minnesota, and our dogs have settled in to a long winter's nap. Hope you're all safe and warm wherever you are.
Tofu: made with home-made red sauce and served over noodles
First I cubed the tofu and dipped it in egg substitute. If you're just a straight up vegetarian, use egg. then I sprinkled a small amount of corn starch on the tofu to fry it, because that's what the internet told me to do. I bet you could use flour or corn flour if you wanted to.
The recipe for how to make this red sauce is here. (click on the word "here").
I made tri-color noodles because they look prettier than your average noodle. We got that strainer for free when we moved into our apartment.
This is an attempt at being artsy. It's just the noodles inside the box.
Here's the final product. Sorry that it looks disgusting, the lighting in our kitchen is terrible.
I mixed the tofu into the red sauce and let it simmer for about 2 minutes to help the tofu soak up the flavor, which it did very well. My overall review for tofu is as follows. I think it's pretty good. It has a slightly beany taste, but it absorbs flavor well, and it's a decent source of protein. Be aware that up to 50% of the calories can be fat, and that there are different levels of firmness, so you should check your recipe before buying. I didn't know that, and so James just bought medium firmness, mainly because it seemed like the safest choice. If you're going to use it as a chicken replacer, get firm or extra firm, and to get the right texture, leave it in the freezer for a bit after cutting it into the desired shape.
Veggie-Burger: with Mango Salsa!
Here's all the ingredients (plus jalapeno, but that was an ugly pic) for mango salsa. Chop cilantro, a little onion, a little jalapeno and a full mango up into small bits. mix and let settle. Yum.
My veggie-burger is on the left, James' turkey burger is on the right. Mine has a bunch of veggies and sunflower seeds, his is ground turkey, which is healthier than beef, and it's more cost-effective.
Here's my mango salsa over the veggie burger. My review: the salsa was delicious, the veggie burger was good, but together, it was weird. The burger was too savory for a fresh mango salsa, it needed other veggies, tomato, lettuce, typical burger veggies. Maybe the salsa would work with a Boca Burger. I got these veggie-burgers at Cosco. Decent price, and good tasting with the right toppings.
This is the chickpea-spinach patty. It's amazing. With a little curry to make it savory and a little spicy, these vegan treats are an absolute delight. I had them with broccoli, which is a good source of protein, and with the chickpeas, so are these patties. I also got these at Cosco. Super yum. Love love love.
Subscribe to:
Posts (Atom)