Thursday, October 24, 2013

D.I.Y. Yarn Pom Poms

Hi friends. So today I was on Pinterest and I realized that there isn't a good step-by-step how-to on yarn Pom poms that are larger than the ones you make with a fork, or, at least not in English, so I made one. Enjoy!
Ok, so first, find scissors, yarn, and cardboard. You might also want something circular to trace.
Trace big circles with little circles inside them.
Cut them out. I used a knife to cut out the middle circle.
Put the two circles together like so.
Start wrapping yarn around both circles.
I had to add yarn in sections because my yarn ball didn't fit through the center circle.
The trick to that method is to tie the yarn ends as close to the middle as possible, because the the knots will be hidden deep inside the pom pom.
When you're all done, it should look kinda like this. The more yarn you put around your cardboard circles, the fuller and thicker your pom pom will be.
Now, put something on top of your circles to keep the yarn from flying around as you cut the outside of the circles. Cut between the two cardboard layers to make sure your pom pom is even.
When it's done it will look kinda like this, again, depending on how much yarn you used.
Move the cardboard circles out just enough so that you can tie a piece of yarn between the two circles. Make sure your the loop goes around all of the yarn. Now, tie it really tight. Like, as tight as you can.
Remove the cardboard circles, and now you have a delightful yarn pom pom. Hurray!


Monday, October 21, 2013

Tarragon Chicken Salad

Hi friends. Ok, so this is the best way to eat leftover chicken. I know I just posted a chicken soup recipe (which was also a wonderful way to use leftover chicken everything), but I love sandwiches and salads, so this is my all-time favorite, plus I still had chicken left over even after the soup! 
Here are your main ingredients. 
1 cup chicken
1/4 cup sliced almonds 
1/4 cup craisins
1 1/2 tsp tarragon 
1 Tbsp red onions finely chopped. ( obviously, I didn't have a red onion, so I supplemented a yellow onion. It doesn't ruin the flavor if you have to supplement)

Add about a tablespoon of fat free mayo and a squeeze of lemon juice to your above five ingredients. Mix mix mix it all up, add a little more mayo if you like having more mayo in your salads, no judgment here, and then salt and pepper to taste.
If you eat it on a sandwich or in a wrap, add lettuce and tomatoes. I put it atop some mixed greens and added some cherry tomatoes.
Enjoy!


Thursday, October 17, 2013

Black Bean Avocado Salad

Hi friends. Today for lunch I made one of our favorite easy dishes, black bean avocado salad. Here's how it's made:
Chop up an onion like this.
Cook the onions in extra virgin olive oil. I added minced garlic. I love garlic. James saw this picture and said "this looks like the beginning of all our dinners". It's sort of true, we make all bean dishes and red sauces this way. Ok, moving on.
While your onions are cooking, drain a can of black beans into a strainer. Rinse and let them dry off a little.
When your onions look like this, it's time to add the beans.
Good job! Ok, so let those things cook together, add some salt and some lime juice if you want to. Sometimes I add fresh cilantro towards the end, or a little cumin right when I add the beans. You can play with it a little.
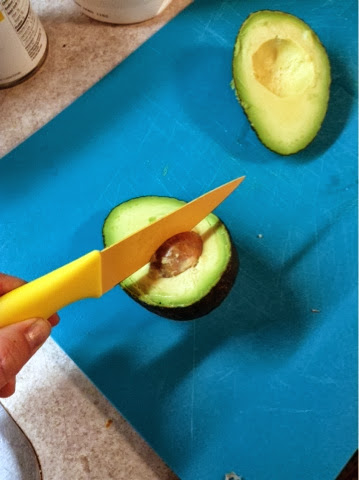
Avocado time. My friend Karen showed me this trick. After you slice the avocado in half, you stick your knife in the middle of the pit, and then turn the pit to free it, then just life up, like so:
Hurray! Anyway...
Slice the avocado longways and short ways.
Squeeze the sides to free the happy little cubes.
Mix them together in a bowl.
You can just eat it straight up, or you can use rice, quinoa, tortillas, tortilla chips, whatever medium you want to eat it. James ate his like this, in a tortilla with cheese.
Enjoy!


Wednesday, October 16, 2013

Crockpot Chicken, two meals in one!

Hi friends. So on Wednesday I decided to cook a whole chicken in my crockpot. I know what some of you are thinking: I don't eat meat! Ok, well, this blog post is probably not for you, unless you find a potato somewhere that looks, cooks, and somehow tastes like a chicken. Others of you might be thinking that touching raw whole chickens is super gross and undesirable. While you couldn't be more right, whole chickens can be less than a dollar a pound (ours was $0.95 a pound regular price at Aldi), plus, you can use your leftover meat and bones to make a whole second meal. So it's actually an amazing deal and totally worth the gross first part.

Unfortunately, I don't have pictures of this first and second step because I was home alone with the dogs and the wee babe I watch, so no one was there to take pics for me and I would've contaminated everything if I'd tried to do it with raw chicken on my hands.

First, take the thawed chicken out of its wrappings, take the bag out of the body cavity (it holds all the innards people use to make stuffing, gravy, and I always just throw it away because it's too gross for me), and give your bird a good rinse with cold water. It will be disgusting, and you will need to clean your sink afterwards, but it gets better, I promise.
Then, pat your bird dry with paper towels. Take a breath, you're almost done touching a raw chicken and you're saving lots of dollars. Hurray! 
After that, you stuff the chicken. I stuffed mine with stuffing I had leftover from thanksgiving of last year. Don't overthink that last bit, it hadn't expired, it was still dried and in the box, let's move on.
I cut up an onion (coarsly chopped, quarter-sized pieces) and threw it at the bottom of the crockpot with a 1/4 cup of water and a little garlic. I put garlic in almost everything, so if you don't, ignore the suggestion. However, if you ignore the garlic suggestion too many times, people will start thinking you're a vampire, and the Twilight fans will be lining up to make out with you, so watch out, garlic could save your life!
Anyway....I put the bird, stuffed and all, in the crock pot and then rubbed it with salt, pepper, poultry seasoning, and thyme. Here's what it looked like:
Here's another pic from another angle:
Always cook the chicken breast side up. It's polite not to leave your chicken friend lying face down in onions and garlic, plus, they cook better that way, so it's also good for you.
Another thing to note is that I add water at the bottom, but it's just as good to spray the crockpot with cooking spray and then stick the chicken in on top of that. The reason I use water is because it's calorie free that way, and that's always fun.
Your chicken is cooked when the temperature of its cavernous insides exceeds 165 degrees Fahrenheit. 
I sautéed some carrots using some of the same spices I used on the chicken as a side dish.
This was the finished product for day one. It was quite good.

After dinner, I started prepping for day two's meal.
Separate the bones and leftover meat from the skin and fat from the chicken.
Or, since it's kind of a gross job, have a dreamy man do it for you. I chose this dreamy man because he lives here, too, and we are married, so that means we have to do nice things for each other.
Add the bones to the extra stuff leftover in the crockpot from when you took out the chicken. Add about six cups of water, turn it to a low setting, and then let it cook for around eight hours. I just let it go overnight, and made sure to wake up decently early in the morning...which I do anyway...
Pour the contents of your slow cooker into a heat-safe bowl, straining while you pour. I just placed a strainer in the bowl I was using and lifted it up once all the pouring was through. Worked slick.
Stick your bowl of chicken broth in the fridge for as long as it takes for the fat to rise to the top.
This is what the hardened fat will look like. It took the fat from my bowl of chicken juice about a day to harden to perfection.
Using a slotted spoon, scoop up all the fat from your bowl.

Now it's time to make chicken soup! 
Collect these materials: 5 stalks of celery, 1 onion and 5 carrots. You can peel the carrots if you want, but I don't bother, I just give the celery and the carrots a good scrub and get on with it.
Cut your veggies up into happy little soup chunks like this. Yum. I truly believe that most food looks better when presented on a blue surface. Ok! Moving on!
Stick all your veggies in your crock pot, add four or five cups of your home-made chicken broth, and turn it on to a low setting. Not your lowest, but, you know, low. Mine only has four settings, off, warm, low, and high, so if you have a nicer crock pot with a bunch of extra settings, just guess. It's hard to mess up a slow cooker recipe. 
Add a half a bag of egg noodles after your veggies have been in there for at least 2 hours.
Cut up at least 2 cups of the chicken meat you saved from the whole chicken you made earlier. Add it at the same time you add the noodles. Stir it all in and wait about an hour.
One that time is up, your soup will be ready for you to enjoy, so please do just that! Happy cooking! Happy saving!


Autumnal Decor

Hi friends. So, I love decorating for different seasons, and since we're smack dab in the middle of Autumn, I thought I should show you some of the fall decorations I have up.
First of all, here's my couch. The yellow pillows I use for spring, summer, and fall, because yellow is so versatile. The quilt I made myself recently. I've only made four quilts, but each one has been an improvement. Here's a couple close up shots of the quilt:
Much to my family's surprise, i finished the quilt in one sitting. Usually I start a quilt and leave it laying around for ages before I get back to it. Not so for this quilt.
This is a little wreath I made years and years ago with a few friends at "Autumnal Fest". I hang mine up somewhere every fall.
This is the candle jar iron pumpkin scene I have going on on top of a bookshelf in the center of our living space. I got the wrought-iron pumpkin from a Goodwill in Bloomington, IN last spring and have been excited to use it ever since. The blue jars are from our wedding and have yellow leaves from the ground outside our back door in them, the orange metal lanterns I bought as I was buying others just like it for my friend Rachel's wedding, and the black lanterns are from our wedding. So basically, a lot of it is reuseables, which is pretty exciting. I use the blue jars in almost every season.
The flowers on the long shelves behind the dining room table are autumnaly. That, of course, isn't really a word, and the blue flowers are actually pretty summery, but I added a crow...so I feel like that makes them creepy, and creepy is Halloweeny, and Halloween is in the fall, so it all works out.
The other crow is amongst the daisies that live in this pitcher next to a cow picture I made when I was three. Notice how I made the spots in nice neat rows. Typical Alicia.